
This checklist is for software testers, QA engineers, and development teams setting up a lab to work with connected devices, peripherals, and test data. It covers equipment that can help organize a workstation and support common lab tasks, while leaving room to match each choice to your setup. Start with your actual testing needs and the devices you expect to connect.

Get business pricing on monitors, keyboards and dev gear
- Business-only prices and quantity discounts
- Tax-exempt purchasing
- Multiple users, one account, clear invoices
The sections are organized by equipment type: a docking station, KVM switch, USB power meter, network switch, portable SSD, and hardware debugger. Some sections include a named pick; the KVM and USB power meter sections offer selection advice without a specific product. Use each section as a separate checklist rather than assuming every lab needs every item.
Before buying, check the interfaces and requirements of your computers and test devices. Confirm port types, display support, network speed, storage capacity, and the software or workflows you plan to use. Verify compatibility against the manufacturer’s specifications, especially when a device will sit between your computer and other lab equipment.
USB-C Docking Station
A docking station can make a lab workstation easier to connect and rearrange when a computer needs access to displays and peripherals. The Anker Prime DL7400 14-in-1 DisplayLink Docking Station is the named pick in this slot. Before choosing it, list the devices you expect to attach at the same time and compare that list with the dock’s documented ports and supported display configuration. Count the connections you will use, not just the total number advertised.
A common buying mistake is assuming that a USB-C connector guarantees the same capabilities across computers. Check the host computer’s port support, the dock’s DisplayLink requirements, and the operating system and driver compatibility details. Confirm display resolution and refresh-rate support for your monitors, along with power delivery requirements if you intend to charge a laptop through the dock. Match the dock to the host computer and the displays in your lab before relying on it for daily work.
Also consider cable reach and desk placement so the dock can connect comfortably without straining ports. If your workflow depends on a particular peripheral, verify that it works through the dock. Test the full connection chain with the computer, displays, and key devices you plan to use.
What to look for:
- Host computer compatibility and DisplayLink driver requirements
- Supported display count, resolution, and refresh rate
- The specific ports needed for lab peripherals
- Power delivery support and laptop requirements
- Cable length and suitable desk placement
Anker Prime DL7400 14-in-1 DisplayLink Docking Station

This docking station connects up to three 4K displays and offers USB-C, USB-A, HDMI, DisplayPort, Ethernet, audio, and SD/TF card ports. It supports laptop charging up to 140W, with a built-in display and fan for monitoring and cooling.
Pros:
- Supports up to three 4K external displays
- Provides up to 140W laptop charging
- Broad selection of ports, including 2.5Gbps Ethernet
- Built-in smart display and fan cooling
Cons:
- Requires a DisplayLink driver for triple-display use
- DRM-protected streaming may show a black screen
- Front USB-C ports do not support video output
Best for: Teams consolidating display and peripheral connections at a USB-C workstation
Not ideal for: Setups whose host ports or display needs do not match its documented support
Bottom line: Choose the Anker Prime DL7400 after confirming host, display, driver, and peripheral compatibility.
KVM Switch
A KVM switch lets a shared keyboard, monitor, and mouse connect to more than one computer, which can be useful when a lab alternates between test systems. There is no named pick for this slot, so begin by identifying the computers and peripherals you want to share. Map every connection before shopping: host video outputs, USB devices, monitor inputs, and any audio or other connections your workflow requires.
A common mistake is buying based on the number of computers alone. Video standards, resolution, refresh rate, and connector types must work across the computers, switch, and monitor. Check whether the switch supports the exact display arrangement you use, including multiple monitors if needed. Confirm the complete video path instead of relying on a product’s headline compatibility description.
For fit, count the USB ports needed for keyboard, mouse, and lab peripherals, then check whether switching is done by a button, hotkey, or another method that suits your bench. Some devices may need a direct connection rather than passing through a switch; consult their requirements. Keep a direct-connect option for peripherals whose behavior matters during testing, and verify the KVM’s operating-system and peripheral support before standardizing on it.
What to look for:
- Number and type of computer inputs
- Video connectors and supported display configurations
- Resolution and refresh-rate support across the full chain
- USB port count and supported peripheral types
- Switching method and operating-system compatibility
USB Power Meter
A USB power meter can help inspect the electrical behavior of USB-powered devices during bench work. No specific model is named here, so choose one around the ports, cables, and measurements your lab actually uses. Start with the device under test: identify its USB connector, expected power range, and whether you need to observe charging or data behavior as well.
A frequent mistake is treating every meter as transparent to the connection. A meter inserted between a host and device may affect data, charging, or negotiation, so check its documented protocols and pass-through behavior. Confirm the supported voltage and current ranges and whether the display or logging features are suitable for your work. Check protocol support carefully if testing USB-C power delivery or other negotiated charging modes.
For practical fit, ensure the meter’s connectors align with the cable orientation and device ports in your setup. Consider whether an inline form factor will be accessible on a crowded bench, and whether you need readings only at a glance or captured for later review. Verify measurement limits and accuracy specifications in the product documentation, especially when results inform debugging decisions. If the meter is used with sensitive equipment, consult both devices’ guidance before inserting it into the test path.
What to look for:
- Supported USB connector types and orientation
- Voltage and current ranges for intended devices
- Documented USB-C power delivery or protocol support
- Data pass-through behavior and compatibility
- Readout or logging features and stated measurement accuracy
Network Switch
A network switch provides wired connections for lab computers and devices, helping a team connect multiple endpoints on a local network. The named pick is the TRENDnet TEG-S3160 16-Port Unmanaged 2.5G Ethernet Switch. Before selecting it, count the wired devices you expect to connect and check the network speeds supported by each endpoint and the rest of your infrastructure. Plan for the whole network path, including adapters, cabling, and any upstream equipment.
One common mistake is assuming that a switch’s port speed determines the speed of every connection. Actual link speed depends on the capabilities of the devices and cabling on both ends. Confirm that the 2.5G ports suit your computers and test equipment, and review the product documentation for any features your lab requires. Because this is an unmanaged switch, verify that its operating model aligns with the way you manage and segment your lab network. Check network management needs before choosing an unmanaged model.
Consider physical fit as well: allow for the switch’s form factor, power connection, port access, and cable routing at the bench or rack. Leave room to label connections clearly if devices move between test setups. Reserve enough usable ports for the current setup and the connections you expect to add, then confirm the exact specifications with the manufacturer.
What to look for:
- Port count against current and planned wired devices
- 2.5G compatibility across endpoints and network equipment
- Cable and adapter support for intended link speeds
- Unmanaged operation suitability for the lab network
- Physical placement, power, and cable access
TRENDnet TEG-S3160 16-Port Unmanaged 2.5G Ethernet Switch

This unmanaged desktop switch provides 16 2.5GBASE-T RJ-45 ports, supporting speeds up to 2.5 Gbps over Cat5e or better cabling. Its fanless metal enclosure supports wall or rack mounting, and it offers 80 Gbps switching capacity.
Pros:
- 16 ports support speeds up to 2.5 Gbps
- 80 Gbps switching capacity
- Fanless design operates quietly
- Metal enclosure supports wall or rack mounting
Cons:
- Unmanaged design offers no advanced switch configuration
- Lifetime protection is limited to the U.S. and Canada
Best for: Labs connecting multiple compatible wired devices
Not ideal for: Networks that require managed switching features
Bottom line: Choose the TRENDnet TEG-S3160 when its port speed, unmanaged operation, and physical setup fit your lab.
Portable SSD
A portable SSD can provide removable storage for test data, build artifacts, and files moved between compatible systems. The named pick is the SanDisk Extreme Portable SSD, 4TB, Up to 2000MB/s. Think about the size and type of files your lab handles, how they will be transferred, and which computers need access. Check the connection on every host so the drive can be used as intended across the team’s devices.
A common mistake is treating a stated maximum transfer speed as a guaranteed speed in every setup. The host port, cable, file sizes, workload, and drive format can all affect real-world use. Review the manufacturer’s interface and performance specifications, and confirm compatibility with the computers and operating systems in your lab. Match the interface end to end, including the supplied or required cable.
For fit, consider whether 4TB suits the amount of data you expect to carry and whether your workflow needs a particular file system or encryption approach. Confirm the drive’s physical dimensions and the manufacturer’s stated durability details if it will travel between benches. A portable drive should not be the only copy of important test results. Plan a separate backup path and decide how the team will label, format, and handle shared data.
What to look for:
- Capacity suited to the data you need to carry
- Host port, interface, and cable compatibility
- Operating-system and file-system requirements
- Performance specifications for the intended workload
- Backup, encryption, and shared-data handling needs
SanDisk Extreme Portable SSD, 4TB, Up to 2000MB/s

This portable 4TB SSD offers read speeds up to 2000MB/s for backing up projects and storing photos and videos. It has an IP65 rating, up to 3-meter drop protection, and password protection with 256-bit AES encryption.
Pros:
- Fast read speeds up to 2000 MB/s
- Large 4 TB capacity
- IP65 water and dust resistance
- Portable design with drop protection
Cons:
- Write speeds are lower than read speeds
- Password protection requires software download and is supported on Windows 10+ and macOS 12+
Best for: Teams moving substantial test data between compatible systems
Not ideal for: Workflows without a separate backup or compatible host connection
Bottom line: Choose the 4TB SanDisk drive after confirming connection, file-system, and data-handling requirements.
Hardware Debugger
A hardware debugger or logic analyzer can help teams inspect digital signals while investigating device behavior. The named pick is the Saleae Logic Pro 16-Channel Logic Analyzer, Red. Before choosing it, identify the signals you need to observe, their logic levels, and the number of channels required for your test setup. Start with the signal requirements and compare them with the analyzer’s documented input specifications.
A common mistake is connecting an analyzer without checking voltage limits, grounding, or probe compatibility. Review the manufacturer’s guidance for supported signal levels, sampling behavior, and connection methods. Confirm that the software works with the computers used in the lab and supports the workflows you need, such as capturing and reviewing traces. Verify electrical compatibility first to protect the test equipment and the device under test.
For fit, consider the available channel count alongside the number of signals you need to capture at once, and check whether the probe accessories suit the board or connector layout. Make sure the physical leads can reach the test points without putting strain on them. If you need to compare signals over time or share findings, check the software’s documented export and analysis options. Choose probes for the actual test points, then follow the analyzer’s connection instructions for each measurement.
What to look for:
- Channel count for simultaneous signals
- Supported logic levels and electrical input limits
- Sampling specifications suited to the signals under study
- Probe and connection options for the target hardware
- Software compatibility and trace review features
Saleae Logic Pro 16-Channel Logic Analyzer, Red
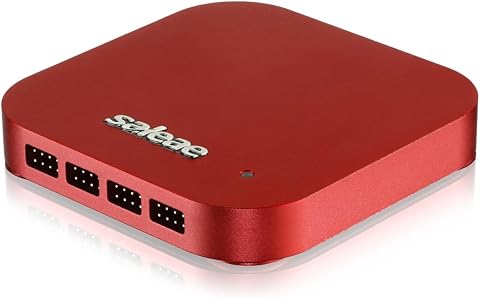
A 16-channel logic analyzer with inputs that support both digital and analog signals. It decodes SPI, I2C, and over 23 other protocols, and works with Windows, macOS, and Linux.
Pros:
- Supports both digital and analog inputs
- Decodes SPI, I2C, and 23+ additional protocols
- High digital and analog sample rates
- Compatible with Windows, macOS, and Linux
Cons:
- Sample capacity uses the connected PC’s memory
Best for: Teams inspecting multiple digital signals during hardware debugging
Not ideal for: Tests outside the analyzer’s documented electrical or software support
Bottom line: Choose the Saleae Logic Pro 16 after matching channel, signal, probe, and software needs.
Buy in a practical order: first cover the connections and measurements your active tests require, then add network and storage capacity that fits the devices and data in use. Verify compatibility before choosing a dock, KVM, switch, meter, or analyzer, and check whether an existing tool already serves the same purpose. Prioritize equipment tied to current test work so each purchase has a clear role.
A useful lab checklist is a starting point, not a fixed recipe. Requirements vary with computers, devices, interfaces, and the way your team runs tests. Keep the manufacturers’ specifications close while comparing options, and revisit the list as your setup changes. Build around your real test workflow, and you’ll have a clearer path to a lab that fits the work ahead.
Halloween Picks
halloween
As an affiliate, we earn on qualifying purchases.